

Table of Contents
- Why Small Tool Collections Need a Different Approach
- How to Store Hand Tools Efficiently: The Core Principles
- Wall-Mounted Storage: Using Vertical Space You Already Have
- Best Tool Storage Systems for Small Spaces: What Actually Works
- DIY Tool Organizer Ideas That Cost Under $20
- Storing Small Hardware: Nails, Screws, and Drill Bits
- Common Mistakes That Turn Small Collections Into Clutter
- Your 3-Step Plan to Organize Small Tool Collections This Weekend
- Frequently Asked Questions
Last Updated: September 8, 2026
A cluttered toolbox costs you more than just time. For most homeowners, the fix isn't a massive tool chest or full workshop. The real solution is learning how to organize small tool collections with systems designed for the space you actually have.
You don't need a big budget or carpentry skills. Below, we'll show you exactly how to sort, store, and maintain your tools so everything has a place.
Why Small Tool Collections Need a Different Approach
Most organization advice assumes you have a 400-square-foot workshop. A small collection crammed into a closet, under a sink, or in a corner of the garage needs a different strategy than a professional's setup.
The biggest mistake is treating a starter toolkit like a professional inventory. You don't need a 52-inch rolling cabinet for 40 tools. What you need is visibility and quick access. According to the National Association of Home Builders' guidance on residential storage, effective storage prioritizes accessibility and clear sight lines over sheer capacity.
Small spaces punish poor systems fast. One loose screwdriver rolling around a drawer makes everything else hard to find.
How to Store Hand Tools Efficiently: The Core Principles
Efficient hand tool storage comes down to two rules: group by type and assign a permanent home.
Sort Everything Into Just Three Groups
Resist the urge to create twenty micro-categories. Three groups cover almost everything:
- Hand tools (wrenches, pliers, screwdrivers, hammers)
- Power tools and accessories (drills, chargers, bits, blades)
- Fasteners and hardware (nails, screws, anchors, small parts)
This simple sorting step takes ten minutes and immediately reveals what you own and what storage you need.
Assign a Home for Every Tool
A tool without a home becomes clutter. Once you've sorted, decide exactly where each group lives. Hand tools might go on a wall-mounted rail. Power tool accessories belong in a dedicated drawer. Fasteners need compartmentalized bins. When every tool has a specific spot, putting things away becomes automatic.
Wall-Mounted Storage: Using Vertical Space You Already Have
Wall space is the most underused real estate in any home. A 4-foot section of wall above a workbench holds dozens of tools that would otherwise crowd a drawer or box.
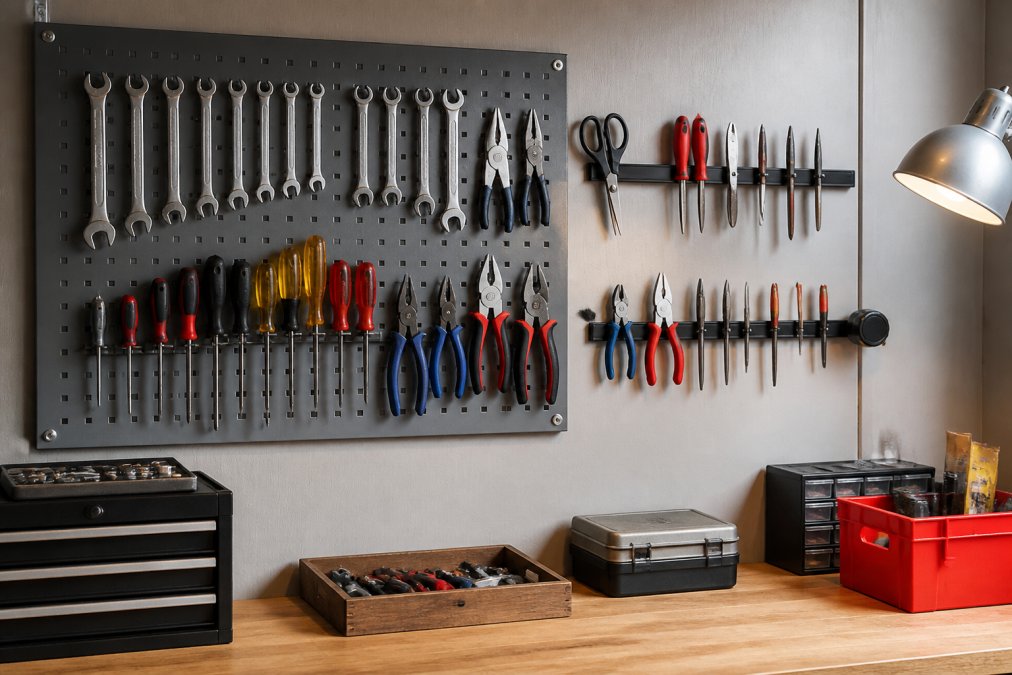
A metal pegboard system is the gold standard for vertical tool storage. Wall Control's steel pegboard panels accept both slotted and standard accessories, letting you customize the layout as your collection grows. Magnetic strips are the budget-friendly complement: a 12-inch strip holds pliers, scissors, and frequently used metal tools for quick grab-and-go access.
Mount everything at a height that makes sense: tools you use weekly should sit between shoulder and waist level, while seasonal or rarely used tools can go higher.
Best Tool Storage Systems for Small Spaces: What Actually Works
The best tool storage systems for small spaces maximize verticality, keep contents visible, and scale with your collection. Here's what performs well in real homes, with the trade-offs you need to know before buying.
Metal Pegboard Panels: The Flexible Standard
A 4x2-foot steel pegboard panel (like those from Wall Control) costs roughly $60-$90 and accepts both standard and proprietary slotted accessories. Steel won't sag or strip out like hardboard. Start with one panel and a mix of 2-inch and 4-inch hooks; add adjacent panels as you grow, keeping a panel never more than 70% covered to preserve visual clarity.
Magnetic Tool Holders: Speed Over Capacity
A 12-inch magnetic strip rated for 30-50 pounds costs $15-$25 and excels for daily-use tools like pliers, scissors, and utility knives. It only holds ferrous metal tools, so use a hook for heavy items like a 16-ounce framing hammer. Mount one strip above the workbench and a second inside a cabinet door for less frequent items.
Clear Plastic Storage Bins: The Visibility Trap
Stackable clear bins ($5-$15 each) fail when stacked more than three high, you can't see into the bottom bins without unstacking. Use a single shelf of labeled bins, each limited to one category. The moment you need a second stack, move to a drawer cabinet or wall-mounted solution. Bins work best for monthly-use tools.
Plastic Drawer Cabinets: The Hardware Workhorse
A 24-drawer Akro-Mils cabinet (about $40-$60) has drawers roughly 1.5 inches deep, perfect for screws and drill bits, but not load-rated for heavy tools. Dedicate one cabinet to fasteners and a separate, deeper unit for power tool accessories. Mount it on the wall at chest height to keep small parts at eye level and free up your work surface.
Roll-Up Tool Bags: The Space-Constrained Choice
A canvas roll-up tool bag (starting around $45) suits apartment dwellers stowing tools in a closet or under a bed, but you must unroll it to see everything. A rigid, open-top tote with a removable tool roll inside offers portability plus quick-grab access. For collections under 30 tools, this is often the single best purchase.
The Modular Expansion Rule
Buy with a growth path in mind: pegboard panels are modular, add panels, not hooks. Drawer cabinets can be stacked only if they share the same footprint. Magnetic strips are the least scalable; when you run out of magnet space, switch that category to a pegboard or drawer. Never buy a storage unit that cannot be mounted, stacked, or extended in at least one direction.
DIY Tool Organizer Ideas That Cost Under $20
DIY tool organizer ideas using materials you already own can solve specific storage problems for almost nothing.
Repurpose a hanging file holder. Pendaflex hanging folders aren't just for paperwork. Mount a file crate on the wall and use the folders to store sandpaper, thin metal templates, and small sheet materials flat and organized. Pendaflex hanging file folders are durable enough for workshop use and cost about $10 per pack.
Use Velcro for odd-shaped tools. A strip of industrial-strength Velcro tape on the inside of a cabinet door holds levels, small saws, and cordless tool batteries flat against the surface. VELCRO Brand industrial strength tape costs around $8 a roll and requires zero tools to install.
Cut foam for a custom shadow board. A sheet of Kaizen foam transforms any shallow drawer into a professional-looking tool organizer. Trace each tool, cut the outline with a utility knife, and peel away layers to the correct depth. The foam keeps tools from sliding and shows you instantly when something is missing.
Storing Small Hardware: Nails, Screws, and Drill Bits
Loose hardware is the number one killer of tool organization. A handful of mixed screws contaminates an entire drawer.
The fix is compartmentalization. A clear plastic drawer cabinet gives each fastener type its own cell: 1-inch drywall screws in one drawer, 3/4-inch wood screws in another, wall anchors in a third. Akro-Mils plastic drawer cabinets are the standard choice here, with multiple drawer sizes that stack on a workbench or mount to a wall.
Sort by type and size, not by project. Grouping by project seems logical until you need a screw sitting in a "bookshelf project" bin. Type-based sorting means you always know exactly where to look.
Common Mistakes That Turn Small Collections Into Clutter
Even with good intentions, small collections spiral back into chaos. These five mistakes cause most of the regression, the fifth is almost never covered in organization guides, yet it silently destroys precision tools.
Buying storage before sorting. Purchasing bins and organizers before you know what you own leads to mismatched solutions. Sort first, measure second, buy third.
Overcrowding drawers. A drawer stuffed to capacity hides tools and discourages putting things away. If a drawer is more than 80% full, you need another storage zone.
Ignoring accessibility. Storing daily-use tools behind rarely used equipment guarantees frustration. The tools you reach for weekly belong in the easiest-to-access spots. This matters especially for aging DIYers who may struggle with high shelves or deep, low drawers.
Skipping labels. Clear bins and drawers only stay organized if you can identify contents at a glance. A $5 label maker or even a permanent marker prevents the "where did I put that?" search.
Ignoring climate control for precision tools. This is the silent killer. Most garages and sheds experience wide temperature and humidity swings; a 30-degree swing in a single day creates condensation on metal surfaces. That condensation is the primary cause of rust on calipers, drill bits, saw blades, and quality screwdriver tips, compromising accuracy and cutting performance.
The fix doesn't require a full HVAC system. A simple, low-cost approach is a sealed storage container with a desiccant pack. Eva-Dry wireless rechargeable dehumidifier units cost about $15-$25 and pull moisture from a sealed cabinet or toolbox without needing to be plugged in. For a small collection, one unit inside a sealed tool chest or a latching plastic bin keeps relative humidity below the 50% threshold where rust begins to form. Another option: silica gel desiccant packs in each drawer of a hardware cabinet, replaced every few months.
A second climate mistake is storing tools directly on a concrete floor, which wicks moisture. A simple plastic pallet or 2x4 frame lifts storage off the floor and dramatically reduces moisture exposure.
Your 3-Step Plan to Organize Small Tool Collections This Weekend
You can complete this entire project in one weekend afternoon. Here's the exact sequence to organize small tool collections without getting overwhelmed.
Step 1: Empty and sort everything (45 minutes). Pull every tool out of every drawer, box, and bag. Sort into your three groups: hand tools, power tools and accessories, fasteners and hardware. Discard broken tools and duplicate items you genuinely don't need.
Step 2: Choose your storage zones (30 minutes). Look at your available wall, drawer, and shelf space. Assign each group a zone: hand tools on the wall, power tool accessories in a drawer or bin, fasteners in a compartmentalized cabinet. Buy only the containers that fill gaps you can't solve with what you own.
Step 3: Install, label, and maintain (45 minutes). Mount your pegboard or magnetic strips, place your bins, and label every container. The final and most important step: commit to a 5-minute reset at the end of each project. Returning tools to their homes immediately prevents future clutter from forming.
A well-organized tool collection makes you more likely to start projects, finish them faster, and actually enjoy the work. The systems above scale as your skills grow.
Organizing a small tool collection is less about buying fancy equipment and more about making deliberate choices with the space you have. At The Daily Drop by Ed Rivera, we believe quality tools and smart storage shouldn't require a massive budget. That's why we curate affordable organizers, storage bins, and workshop essentials alongside daily deals across tools and home goods. Check back often because new finds are added regularly, and you can always reach out about bulk pricing for rental properties or business needs.
Frequently Asked Questions
How do you organize a small tool collection when you have no workbench?
Without a workbench, your best options are wall-mounted systems like a metal pegboard or a magnetic strip. Both keep tools visible and off the floor. A rolling tool bag or a portable toolbox can also serve as a mobile work surface. Use the inside of cabinet doors with adhesive hooks or a small hanging organizer for frequently used tools. The key is to use vertical space and avoid letting tools pile up in corners or boxes.
What is the best way to store hand tools efficiently in a drawer?
Drawer dividers are the most effective way to store hand tools efficiently. They create fixed compartments so wrenches, pliers, and screwdrivers do not slide into a jumbled mess. For deeper drawers, cut a Kaizen foam insert to create a shadow board that holds each tool in place. This approach also shows you instantly when a tool is missing. Group tools by type or by project to make finding the right one faster.
What are some budget-friendly DIY tool organizer ideas for small collections?
Several effective DIY tool organizers cost very little. Repurpose clear plastic storage bins to group tools by project and label each one. Use magnetic strips from an old speaker or hard drive to hold metal tools on the wall. Attach small jars or tin cans to a board to sort nails, screws, and bits. A simple scrap wood rack can hold spray cans or clamps. These ideas keep your collection tidy without buying expensive systems.
How do I decide what to keep when organizing a small tool collection?
Start by pulling everything out and sorting into three piles: keep, repair, and remove. Keep only tools you have used in the last year or that you know you will need soon. For tools that are broken or duplicates, repair them or pass them along. Be honest about specialty items you rarely touch. A small collection should hold only what fits your regular projects. This makes the remaining organization steps much simpler.